참고 자료
Quickstart: Use Azure Cache for Redis with Node.js - https://docs.microsoft.com/en-us/azure/azure-cache-for-redis/cache-nodejs-get-started
개요
Azure Cache for Redis Standard를 배포한 후 정상적으로 연결되는지 테스트하는 방법을 설명합니다.
*Azure Cache for Redis 사용 방법에 대한 설명이 아닙니다. 정상적으로 연결되는지를 확인하는 방법을 설명합니다.
테스트 환경
Azure Cache for Redis Standard를 배포한 후, Azure의 Windows 2016 VM에서 연결해봤습니다.
테스트 절차
Step 1. Azure Cache for Redis 배포
Azure 포털에서 Azure Cache for Redis를 배포합니다.

테스트에서는 Pricing tier를 Standard C2로 선택했습니다. 참고로 Standard tier는 Availability zone, Redis Cluster, Data persistence 등을 설정할 수 없으며, 특히 Virtual Network의 Subnet에 넣을 수 없습니다.

Premium tier는 Availability zone, Redis Cluster, Data persistence를 지원하며, Virtual Network의 Subnet에 넣을 수 있습니다. 단, Subnet은 Azure Cache for Redis 전용(Dedicated) Subnet이어야 합니다. 즉, 다른 리소스(NIC, Loadbalancer frontend IP 등)가 배포된 Subnet에는 Redis를 배포할 수 없습니다. 다른 리소스가 배포된 Subnet에 Redis를 배포하면 배포가 실패합니다.
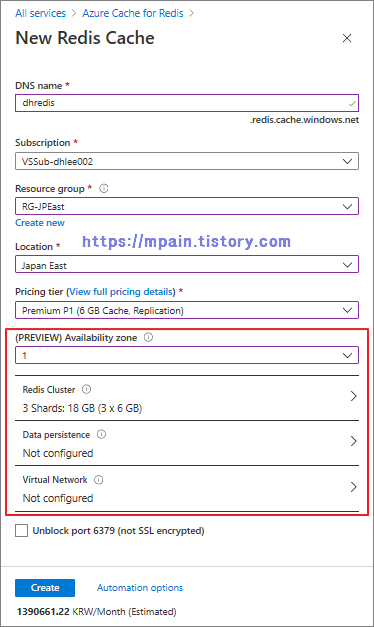
테스트에서는 Standard tier로 배포했습니다.
배포가 완료된 후 Hostname, Port, Access key를 확인합니다. 이 정보들은 Redis cache에 연결할 때 사용됩니다.

Step 2. 테스트용 Azure VM 준비
테스트에서는 Azure의 Windows Server 2016 VM을 사용했지만, 개인 Windows PC (Windows 10)를 사용해도 됩니다.
테스트용 Windows VM에 Node.js (v14.11)를 설치하고, 아래 명령을 실행하여 테스트에 필요한 패키지들을 설치합니다.
npm install redis bluebird

이전 단계에서 확인한 Hostname과 Access key를 환경 변수(environment variables)에 추가합니다.
set REDISCACHEHOSTNAME=contosoCache.redis.cache.windows.net
set REDISCACHEKEY=XXXXXXXXXXXXXXXXXXXXXXXXXXXXXXXXXXXXXXXXXXXX

Step 3. 연결 테스트용 Javascript 파일 생성
redistest.js 라는 이름의 파일을 만들고 아래의 내용을 붙여넣기합니다.
|
var redis = require("redis"); var bluebird = require("bluebird");
// Convert Redis client API to use promises, to make it usable with async/await syntax bluebird.promisifyAll(redis.RedisClient.prototype); bluebird.promisifyAll(redis.Multi.prototype);
async function testCache() {
// Connect to the Azure Cache for Redis over the TLS port using the key. var cacheConnection = redis.createClient(6380, process.env.REDISCACHEHOSTNAME, {auth_pass: process.env.REDISCACHEKEY, tls: {servername: process.env.REDISCACHEHOSTNAME}});
// Perform cache operations using the cache connection object...
// Simple PING command console.log("\nCache command: PING"); console.log("Cache response : " + await cacheConnection.pingAsync());
// Simple get and put of integral data types into the cache console.log("\nCache command: GET Message"); console.log("Cache response : " + await cacheConnection.getAsync("Message"));
console.log("\nCache command: SET Message"); console.log("Cache response : " + await cacheConnection.setAsync("Message", "Hello! The cache is working from Node.js!"));
// Demonstrate "SET Message" executed as expected... console.log("\nCache command: GET Message"); console.log("Cache response : " + await cacheConnection.getAsync("Message"));
// Get the client list, useful to see if connection list is growing... console.log("\nCache command: CLIENT LIST"); console.log("Cache response : " + await cacheConnection.clientAsync("LIST")); }
testCache(); |
Step 4. 연결 테스트
Node.js에서 Script를 실행합니다.
node redistest.js
연결이 실패했습니다.

Azure Cache for Redis의 Firewall에 VM의 Public IP 주소를 등록해야 합니다. (https://ipinfo.io 혹은 https://ifconfig.me 에서 Public IP 주소 확인 가능)
기본적으로 Redis의 Firewall은 Rule이 아무것도 설정되지 않은 상태에서는 모든 연결을 허용하지만, Rule이 하나라도 설정된 후에는 Rule에 등록된 IP 주소에 대해서만 연결을 허용합니다.

Redis Cache의 방화벽에 VM의 Public IP 주소를 등록한 후 다시 Node.js에서 Script를 실행합니다.
node redistest.js
정상적으로 연결된다면 아래와 같이 출력됩니다.

-끝-
'Microsoft > Azure' 카테고리의 다른 글
| Azure NSG Flow log #1 - Overview (0) | 2020.09.26 |
|---|---|
| [PowerShell] Azure NSG 복사 (Rule Export and Import) (0) | 2020.09.20 |
| Azure Standard Internal Load Balancer의 Backend VM 인터넷 연결 허용 - NAT Gateway (0) | 2020.09.17 |
| Azure Bastion 배포 및 사용 방법 (0) | 2020.09.13 |
| [Azure] [PowerShell] Data Disk Host Caching 변경 (0) | 2020.07.03 |